Dracula As Inspiration | Easy Cartoon Vampire Drawing | Drawing Vampire - Full Body
It's that time of the year again! Halloween is the perfect time to go all out with all those dark and haunting illustrations, decor, and costumes. A popular and recurring favorite across people of all ages are vampires. They have long been a subject of horror and fascination. In the olden days, people believed that vampires were one of the causes of diseases and plagues. They have been part of folklore and fictional stories across many cultures for hundreds of years, but most notably across Europe. Anti-vampire rituals went on until the late 1800s.
Nowadays, the most common characteristics of modern day vampires are that they are fanged, can't go under the sun, drink human blood, have no mirror reflections, can only enter your abode when invited, and can be kept away with garlic among others. All these colorful and interesting traits make for great stories, books, movies, shows, games, party/event themes, and of course - drawings and paintings! Here, I'll be showing you how to draw a vampire in two different ways. So you can choose which one you'd like to try out or maybe even do them both, why not?
TABLE OF CONTENTS: Looking for something in particular? Jump ahead using the links below:
Using Dracula As Inspiration
Easy Vampire Drawing - Head Only
How To Draw A Vampire - Full Body
Using Dracula As Inspiration
The most iconic visual representation of a vampire is perhaps that of Count Dracula, a Transylvanian noble character from Bram Stoker's novel titled "Dracula". The fashion during the Victorian era along with the dramatic cape he wears really make for great illustrations, so I'll be using him as my reference for the vampire drawings below.

Easy Vampire Drawing - Head Only
Let's start with just the head, a more close-up illustration of the vampire. This step-by-step tutorial of how to draw a cartoon vampire has simpler lines and a bit of exaggeration on some facial features. But don't let this stop you from tweaking it to your own liking, after all we're doing a cartoonish drawing style. You can add more details and totally use any medium you prefer to add color.
Step 1
Since this will be just the face, use the portrait orientation of your paper or substrate. It will be much easier to achieve a balanced placement of the subject. Find the approximate center line on your surface and draw the circle above it. Draw this lightly as this is just a guide for shaping the upper part of the head and you will need to erase it later on.
Step 2
Now using the circle guide, add the lower part of the head. This head is at an angle, so the cheekbone and the chin's contours are clearly visible on the left, while the jawline is more prominent on the right. I also made the chin long and pointy to give it that witchy look.

Step 3
Let's add a widow's peak for the hairline. Start from the left side and continue drawing to the sideburns and then the right ear. Then add the hair on the top of the head. And finally draw the part of the left ear that's visible from this angle.
Step 4
Now, let's add the nose so it can serve as the guide for where to place the other facial features after. Keep in mind the angle of the face. I drew a fantastically hooked shape nose that perfectly goes well with the pointy chin for an effective yet easy vampire drawing.
Step 5
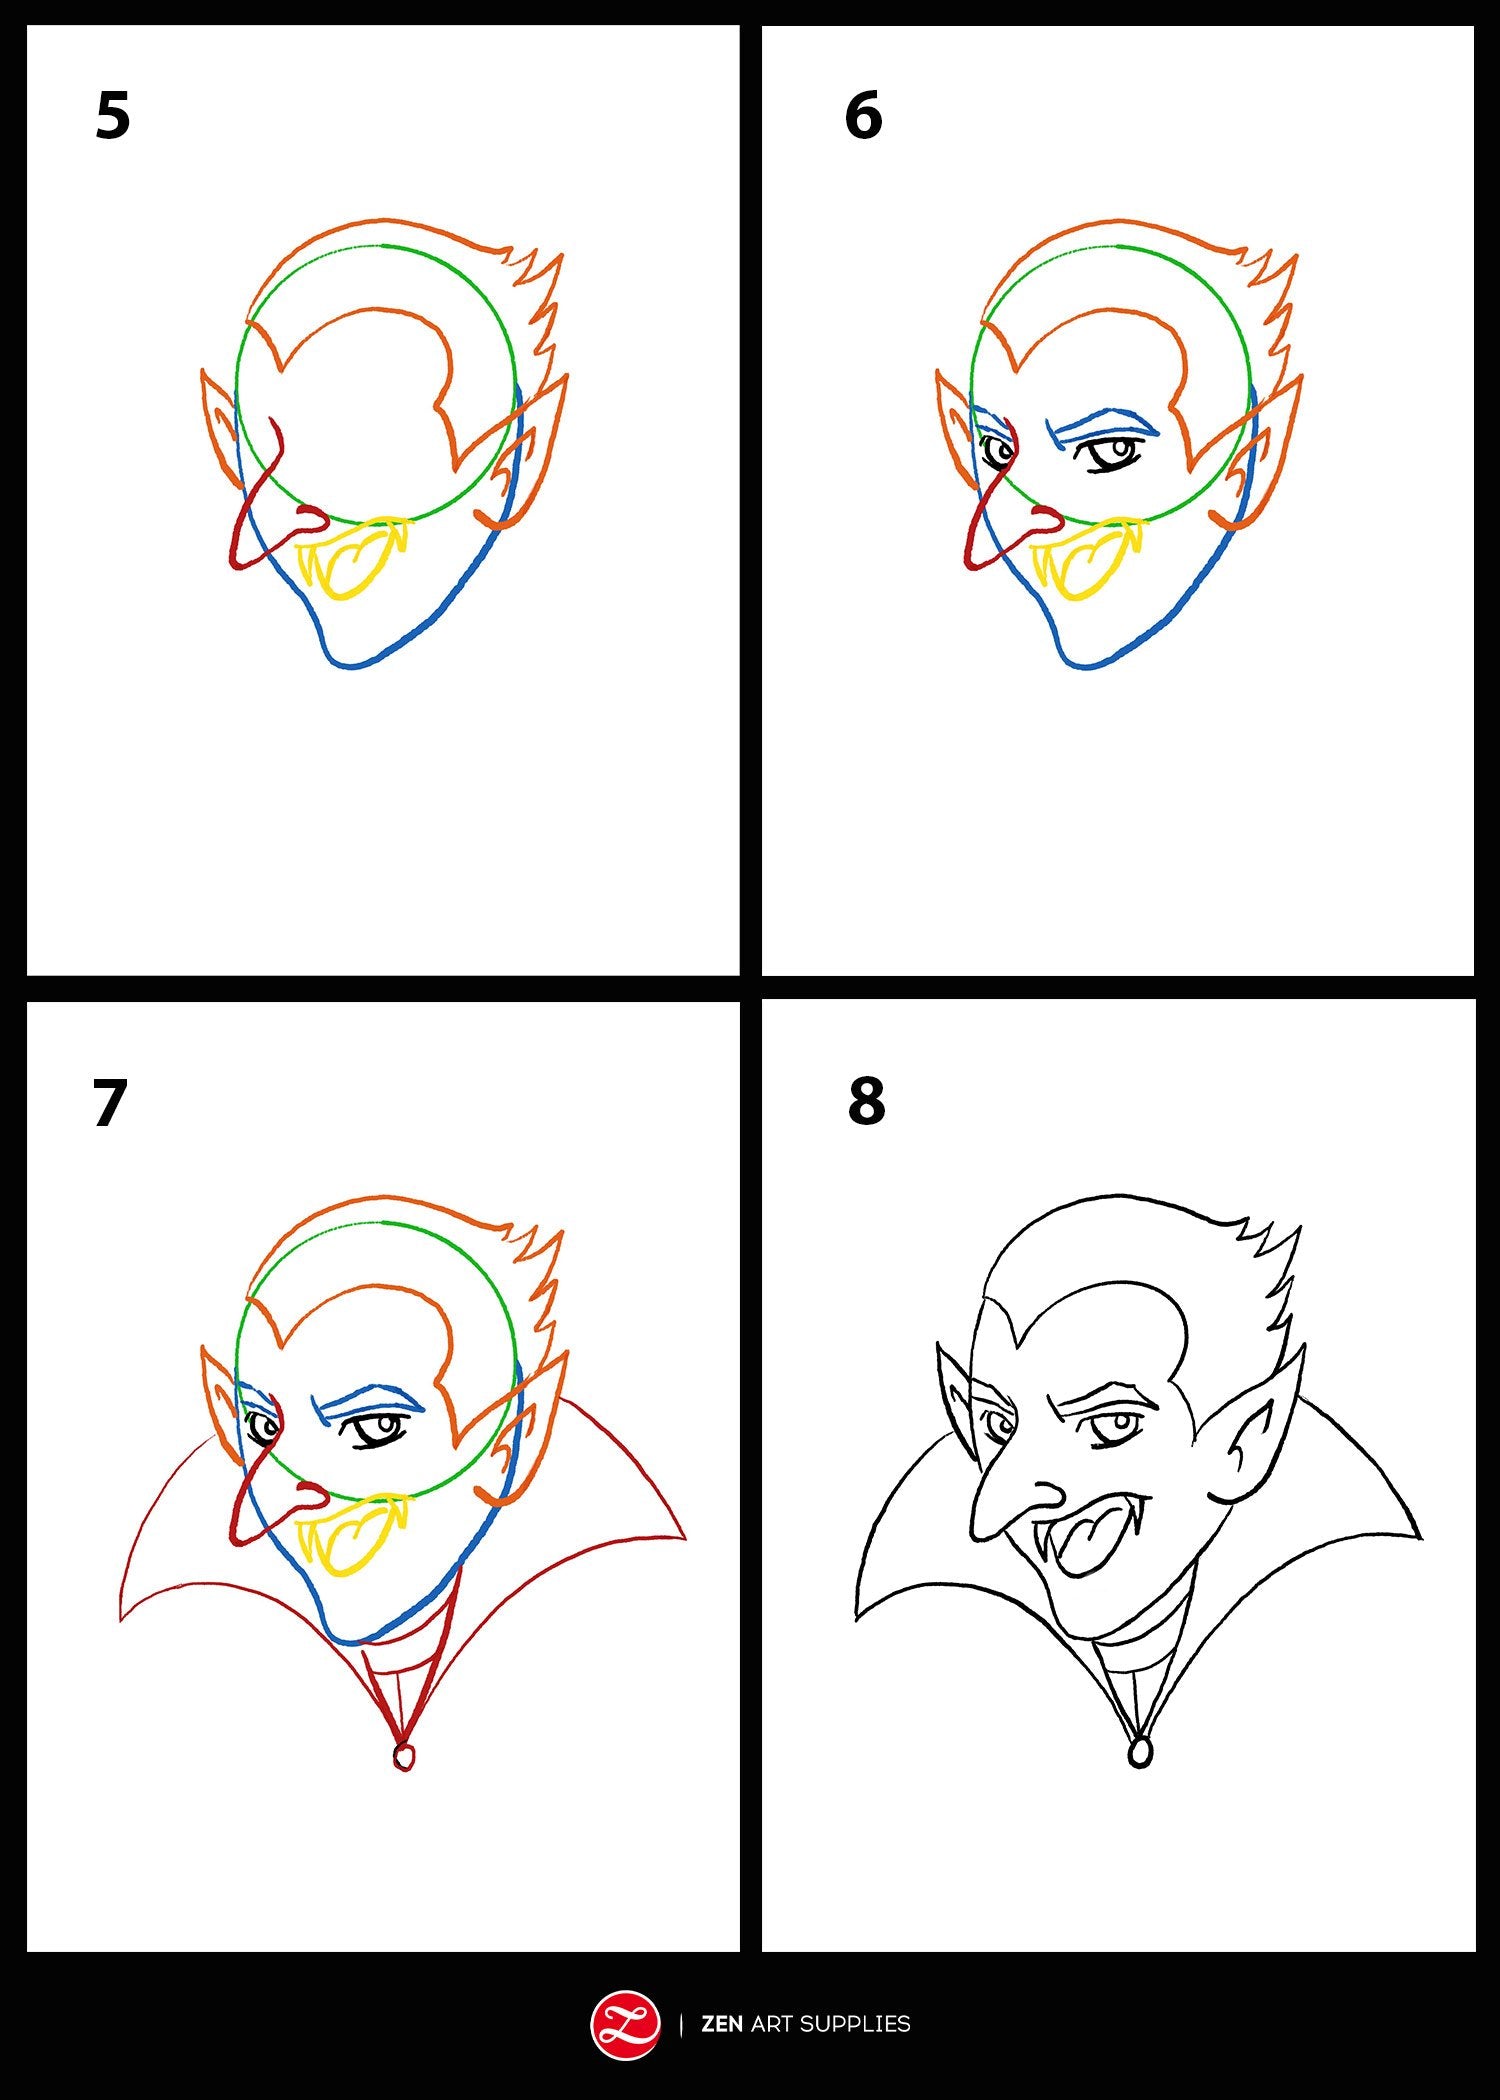
Next, draw in the mouth. You can do Step 6 first if you like to have the eyes drawn in before working on the mouth. Here I opted for an open mouth that's in mid-snarl for that extra touch of frightfulness, draw the tongue too so it won't look like an empty cavernous space. And don't forget to add those fangs in, it won't be complete without them!
Step 6
And we're finally down to our last facial features - the eyes and eyebrows. Add the thick and bushy eyebrows on the same level as the top of the nose. Then draw the eyes under, the left eye is partly hidden by the nose and appears smaller than the right from this angle.
Step 7
Now it's time to work on the cape. Draw a slightly curving V-shape from the chin to the middle of the right jawline. Then add a birdlike shaped V below that with their center parts overlapping/connecting to each other. You can stop at that or you can add the shirt and the button detail like I did. Or personalize it your own way!
Step 8
The drawing is finished! You can now trace it using a pen, or paint it with your chosen medium. Or you can do both, too. Have fun with it, this easy vampire drawing is just here to guide you and help you start.
Here's a close-up of the final line drawing, it already looks great as it is. You can even create a series out of this with different colors and textures, that could be fun!

For my final drawing I used pen and ink - 0.1 and 0.4 drawing pen with water-resistant black ink and a medium sized nib fountain pen with rust red ink. I wanted to explore and play with a very textured drawing. Explore the different sketching techniques you can fully use on their own or in mixed media applications if you're looking to create something similar to what I did.

How To Draw A Vampire - Full Body
If you're up for a full body drawing, then this one's for you. This is more on the realistic side so it will take a few extra steps. But it'll be totally worth it, I promise.
Step 1 and 2
Remember when you were a kid and first drew a human figure? Most of us drew a simplified stick figure. It's the same principle for breaking down the complex human form into simpler parts. A modified stick figure that includes all the joints! Start by drawing the head, then the spine, the hips, the shoulders, the elbows, the wrists, the knees, and the ankles. This will be your guide, so draw this lightly as you will also need to erase this later.
Here's a quick look and guide at a proportional human form. Knowing the right proportions will help you draw a human figure that won't end up with arms too long or legs too short. You can watch a video from a live tutorial I did of How To Sketch People Quickly if you want an overview of it.

Once you have that down, then you can start detailing the head in. Using the same widow's peak and pointy ears, I outlined the shape of the head and hairline. When drawing vampires, it's important to get the head and face right!
Step 3 and 4
Zooming in, draw in the rest of the facial features - eyes, eyebrows, nose, and mouth. If you're unsure about the proportions and the placement, check out this How To Draw A Basic Portrait article to help you out.

Step 5 and 6
Next, let's work on the coat starting with the wide lapels, going downwards and back up and out. Then let's add the sleeves using the stick figure arms and joints as the guide. Start from the shoulders and work your way down to the armpits.
Step 7 and 8
Draw in the waistcoat and the bow tie, again you can totally play around with this and make your own style. Here I just made the usual button down waistcoat and kept it simple. Then I added the pants, using the stick legs and joints as a guide for the length and shape.

Step 9 and 10
Draw the shoes that you'd like your vampire to have! I just opted for a rounded toe with a very slight pointed tip for mine. Next, draw the hands in, just the lower part of the palm and the thumbs, the rest will be covered by the cape he's holding out.
Step 11 and 12
It's time to add the ever so flamboyant and dramatic cape to complete the composition - my favorite part! Start at the top surrounding the head, then work towards the hands holding them out. I made the cape's hem have curving and sharp tips that mimic a bat's wings. Add those draping parts to make it not just realistic but create more impact as well.
And the drawing is now complete! You can trace over your sketch and do a pen and ink drawing, or do a full color painting, or a mixed media, it's all up to you!

Here's a closer look at the final drawing of how to draw a vampire- full body, I just love the drama of this pose!

And now with added color using ZenART Supplies' two main watercolor palettes - Allegro and Sereno.

A breakdown of the color palette used: From the Sereno Palette - Payne's Grey was used for the waistcoat, Indigo for the background wash, and Prussian Blue mixed with Lamp Black from the Allegro Palette for the trousers. From the Allegro Palette - Lamp Black for the coat and shoes, Vermilion for the cape, Vermilion mixed with Brown Ochre for the shadows on the cape.

There are so many other details you can add if you're looking to create a whole setting for your vampire drawings or paintings. You can add a coffin, bats, cobwebs, an eerie castle in the background... It's quite a fun and exciting theme to create! I'm actually very excited to see what you come up with, so please do share your own creations with us! Just use the #zenartsupplies on Instagram or just tag ZenART Supplies, so we can share and feature your creations!
We'd love to hear back from you!
Which vampire do you think you'll draw or paint? Are you thinking of doing both? What's your favorite Halloween theme or decor? What future content would you like to see from us? Let me know in the comments below! Join our friendly art community Painting Inspiration Daily on Facebook. You can share your art and ideas, watch LIVE tutorials, and be inspired to paint!
Autumn has come with all its beautiful warm and vibrant colors, watch out for our next Toolkit: How To Paint Leaves - Autumn Edition. Meanwhile, have a fabulous time drawing vampires and other ghoulish creatures!
- MEET THE AUTHOR-

Kathleen is the Wordsmith at ZenART, resident artist and art editor. When God sent a shower of talents, Kathleen made sure she got a basketful of them! She's a visual artist with practical knowledge on various fields from painting and sculpture, to costume and set design which comes in very handy when writing about various art techniques and theories. She also shares her passion for the arts through teaching. She runs her own brand of handmade wirework jewelry designs.


