Painting Simple Leaves With Watercolor | Use Of Various Techniques | Color Palette Used
The summer heat has passed and now the cold months have arrived. Leaves have started to change color from the varied greens slowly turning into warm and vibrant yellows, browns, oranges and reds - signaling that Autumn has come. And then they start to fall, hence the other name for this season - Fall. It's too good an opportunity to pass, those beautiful fiery leaves just waiting to be turned into fantastic works of art!
In this watercolor fall leaves tutorial, I'll be showing you a step by step process of how I paint autumn leaves with watercolor. Let's keep it simple and easy by just painting one or two leaves at a time. You can always paint more later on once you get the hang of it and create a whole composition out of more leaves. And I'm sure you will because it's just so much fun to do, promise!
TABLE OF CONTENTS: Looking for something in particular? Jump ahead using the links below:
Materials
How To Paint A Simple Leaf In Watercolor
Final Steps For How To Paint Leaves
Splattering For Extra Texture
Materials:
Before we start, I'll list down the materials I'll be using so you can prepare them.

Watercolor paints - the Allegro Palette from ZenART Supplies is the perfect choice for this as it contains a wonderful selection of the warmer colors.
Watercolor brushes - I'll be using brushes from the Turner Collection of ZenART Supplies.
Mixing plate - this will come in handy especially when you want to mix your own colors.
Watercolor paper - make sure it's thick enough, preferably at least 300gsm so it can handle a variety of techniques.
A jar or two of clean water - why two? Well, you don't need to have two but many find it useful to have one just for rinsing your brushes in and the other for diluting or adding to your mixtures.
Paper towel or your preferred absorbent material - for color lifting techniques and absorbing excess water or pigment from your brushes/paper.
Color Palette Used
I used a total of three colors using the fantastic warm range of colors from the Allegro Palette from ZenART Supplies.

How To Paint A Fall Leaf In Watercolor
Fall leaves have beautiful burnt and warm colors that just blend well together, making them quite easy and enjoyable to paint. And the maple leaf is just the perfect leaf choice, the shape of the leaf itself already makes for a compelling choice.
First things first, relax and let go of the idea of painting it as realistic as you can. Instead, focus more on the play of light and the beautiful colors while improving your techniques as you go on. We'll use a mix of wet-on-wet and wet-on-dry to create beautiful textural effects. Not sure exactly how they differ from each other? No worries, check out our watercolor painting techniques and our watercolor for beginners articles to find out.

Step 1
Sketch out your leaf (or leaves if you want to do more) lightly on your watercolor paper. You can use your own leaf, use the same leaf/leaves above that I used for my reference, or you can download here for the single leaf and here for the two leaves to print out the quick sketches I did and transfer them to your paper.


Step 2
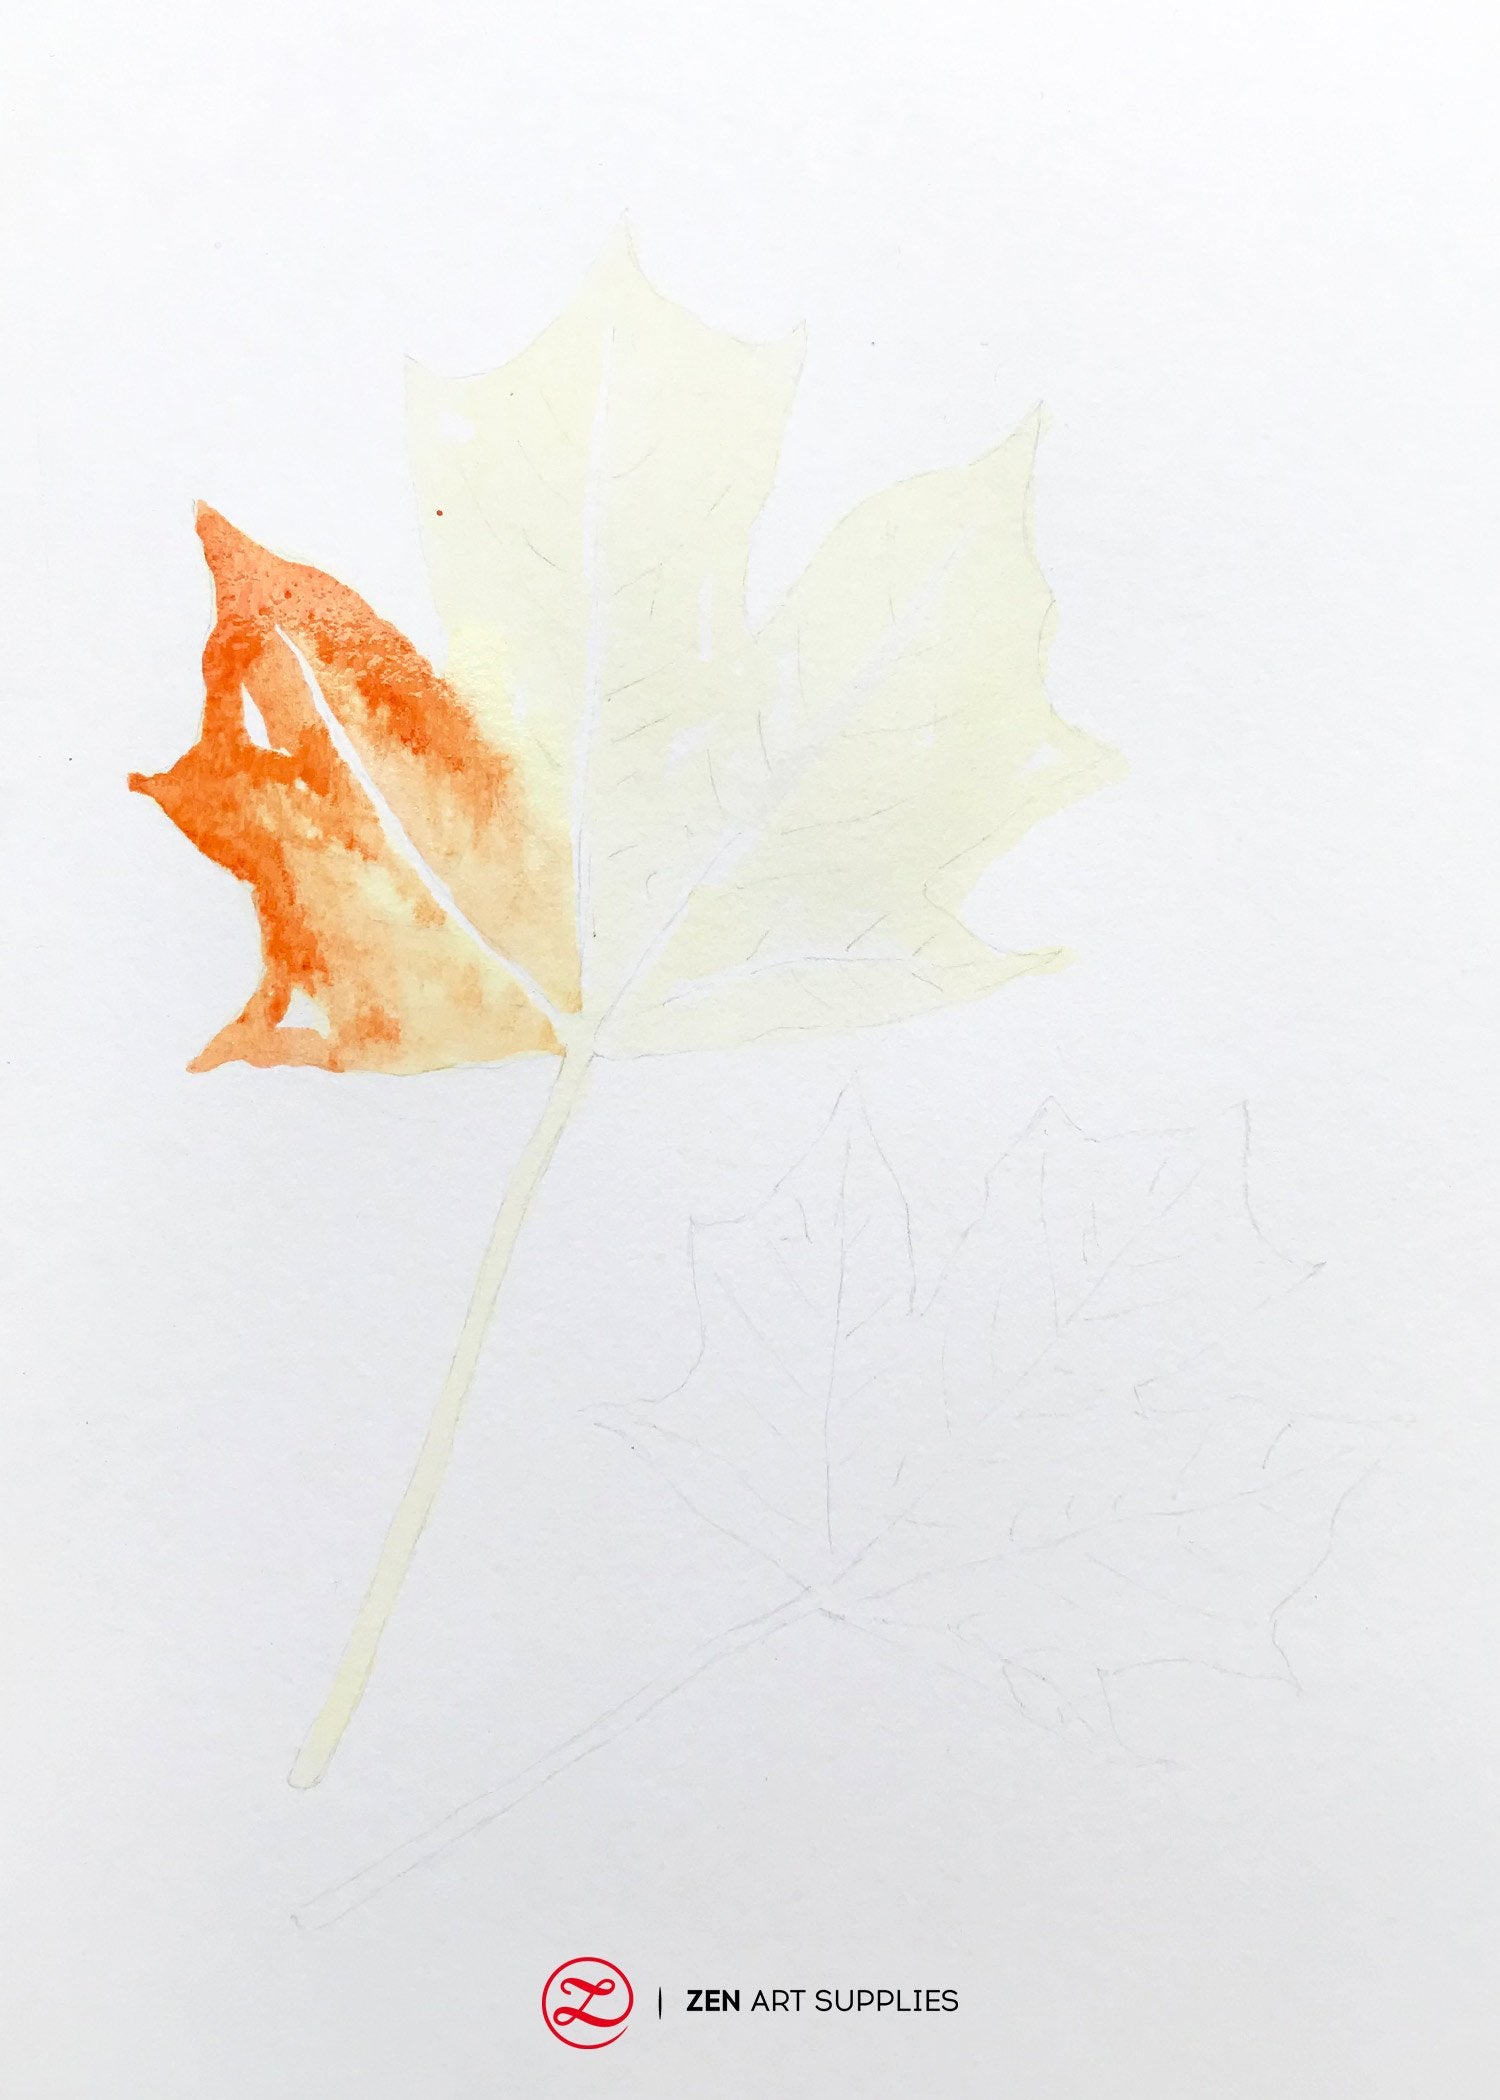
Paint the first layer all over the leaf sketch using yellow that's been thinned down, make sure it's wet enough but not overly soaking wet. If your leaf has lighter veins, then make sure to leave that white or painted with an even paler yellow - one that's almost white.
I also like to leave white unpainted spots here and there to add extra texture to the overall look. Using this method when painting leaves on trees is also quite effective, it gives the illusion of light filtering through.
Step 3
While the yellow paint is still wet, get some orange and dab or paint it in. Don't cover the whole yellow part. Start at the edges of the leaf and allow the orange to slowly seep into the yellow at the edges. This will vary depending on the colors of the leaf/leaves that you'll be using as your reference. Some leaves will have more intense colors at the base and center, and some are a mix of both.
As the two colors start to blend, this will give you a diffused effect with softer edges. That is the magic of using the wet-on-wet technique, no two leaves will ever be the same.

Step 4 - Watercolor Fall Leaves Using Wet-On-Dry
Now let's allow those two layers to completely dry to prepare for the next step using a different watercolor technique. If you're impatient like I am at times, you can use a hairdryer to quicken the drying process. Once dry, re-wet the outer parts of the leaf where the color is most saturated (based on your reference or imagination) using a clean brush loaded with clean water. Try to mimic the shape of the leaf when you do this so it'll look more natural. Then add a deeper and more vibrant mix of red-orange on the wet parts, again allow the paint to slowly diffuse on its own.


Step 5 - Final Steps For How To Paint Autumn Leaves
It's time to work on the veins.
Version 1
If the veins on your leaf are dark like mine, then you can do one of the following:
Use a round brush with a pointy end to paint in the fine veins of the leaf. Starting with thicker lines at the base, and slowly tapering to fine tips as it moves outwards. Some lines will be darker and some lighter, observe your leaf closely.

Version 2
You can also use a sharp edge such as the tip of a palette knife, the tip of a utility knife, or the pointy end of your brush's handle to carve in the vein lines. By scoring the paper, it creates indentations that the surrounding water and pigment will slowly pool into. Thus creating the dark veins of your leaf quite easily. This must be done while the paint is still wet, otherwise it won't work out.

Version 3
If the veins on your leaf are light and pale, then by just making sure to leave them unpainted throughout your previous layerings will do the trick. I did this for the thicker veins that spring forth from the base of the leaf. And for the thinner veins, I used an angle brush to color lift off those lines. Just dampen your brush using clean water and lift off the color in the shape of the veins. Wipe off and rinse your brush every now and then as you go along. As the areas around have become darker as you added the layers, the veins will just naturally pop out.

Step 6 - Splattering For Extra Texture
You may skip this if you're already happy with the leaf that you have. First, allow the previous layers to fully dry. This next step is to add additional texture to the leaf. Use a brownish mix to add some splattering here and there. Create a consistency that makes the splattering easier to do and load your brush with it. Then tap it against your finger to control the splattering. Make sure to cover the parts that you don't want the splatter to reach with some scrap paper or tissue.

And et voila, you now have beautiful autumn leaves! You can make as many as you want and you can use the same techniques for various kinds of leaves. And not just for autumn leaves, you only need to change the colors you use but the same processes will still be effective.


I hope you found this how to paint leaves featuring autumn leaves tutorial useful and helpful. Where I'm from there aren't really any actual fall leaves lying around. If you have them where you are that is awesome, you can pick different ones and fully explore watercolor fall leaves painting. Just have fun with it and play around with different techniques and color mixes, that's the best way to find out what works for you.
We'd love to hear back from you!
Which leaf type are you looking to paint? Do you love the colors of autumn? What future content would you like to see from us? Let me know in the comments below! Join our friendly art community Painting Inspiration Daily on Facebook. You can share your art and ideas, watch LIVE tutorials, and be inspired to paint!
Find out What Kind Of Paint To Use On Pumpkins in our next Toolkit article. Until then, have a wonderful time painting watercolor fall leaves!

- MEET THE AUTHOR-

Kathleen is the Wordsmith at ZenART, resident artist and art editor. When God sent a shower of talents, Kathleen made sure she got a basketful of them! She's a visual artist with practical knowledge on various fields from painting and sculpture, to costume and set design which comes in very handy when writing about various art techniques and theories. She also shares her passion for the arts through teaching. She runs her own brand of handmade wirework jewelry designs.


