Drawing A Reindeer Head | Easy Reindeer Drawing | Step-by-Step
Reindeer, also known as caribous make for magnificent subjects no matter what medium you use. The most typical that people opt to draw or paint are the ones with antlers that have grown awesomely big and majestic. You can draw them any time of the year, you don't have to limit yourself by drawing them just for winter or Christmas time. I'll be showing you how to draw a reindeer in a more realistic style. We'll just tackle the head for now as that has the most distinctive features of the reindeer anyway. No worries, you'll be able to see how you can easily do it in this quick and easy step-by-step tutorial.
Since this is focused on the drawing style, you'll only need the most basic of things. You'll only need your sketchbook, a pencil (preferable HB or your preferred hard-leaded pencil for light sketching), a kneaded eraser, and the steps I'll be showing you below. What to do and use after that is up to you!

Easy Reindeer Drawing Step-by-Step
And let's jump right to it, we'll start by breaking down what seems to be a complex shape. Make sure you have enough space for the antlers on the upper area of your paper before sketching out the first step. That way, you won't regretfully run out of space just when you're detailing those fabulous crowning glories.
Step 1
Start by drawing a circle for the upper part of the reindeer's skull. Don't worry about making it perfect, it's just a guide and won't be part of the final work. Then draw a smaller circle with the approximate circumference of the snout barely overlapping the previous circle at the bottom. Next, connect the two circles together using two lines, somewhere just above the eyes would be on both sides.

Step 2
It's time to add the neck part, just draw a cone-like shape with the top part chopped off as this connects to the head of the reindeer. Now, you can finally add the details starting with the ears. And then tracing around and down to the neck and upper torso, following the shape of a reindeer's neck and tapering down to a soft tip at the base.

Step 3
We're now getting into more details and the more intricate parts of this how to draw a reindeer tutorial. You can start with the eyes, nose, and mouth or with the beautiful antlers on top. That's totally up to you. Just make sure the antlers are about the same size, length, and with a somewhat symmetrical design. Draw the eyes at the edge of the circle and between the two straight lines. The nose is on the upper part of the smaller circle, taking up 2/3 of the circle space. And then add the lines for the mouth openings. Antlers come in various shapes and sizes so feel free to change this around if you find another reference that you'd like to follow instead.

Step 4
And now you can get down to drawing in, shading in, or painting in the drawing to finish it off. Darken the eyes, but don't forget to add light reflections on them. Darken the nose as well and just like what we did with the eyes, don't forget to add highlights. The nostrils should have the darkest color and shadow, and since that part is often wet, it can also have very subtle highlights.

Step 5
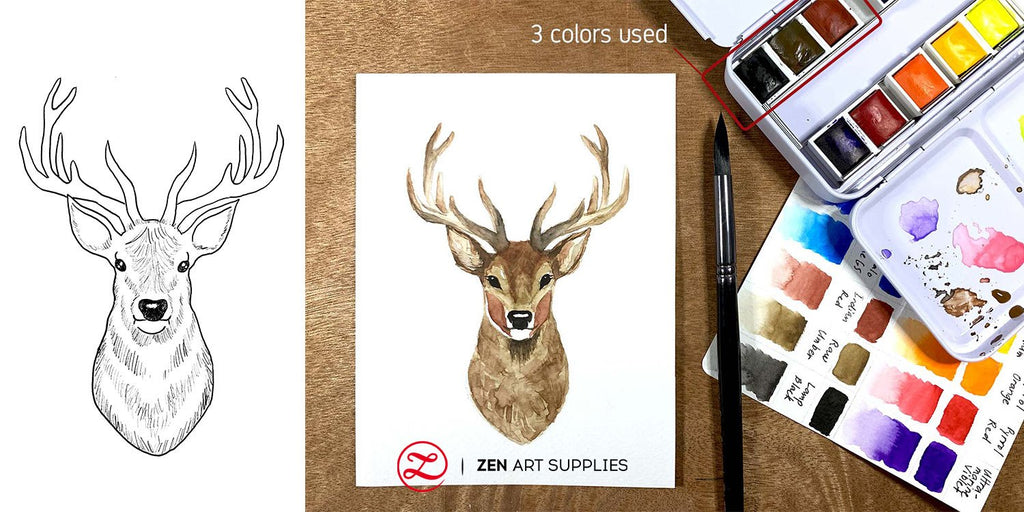
For pen and ink, use pens in different sizes so you can vary your lines from heavy weighted ones to very fine lines. I typically use sizes ranging from 0.1 to 0.5, experiment with the different sizes and different kinds of pens to see what works for you and what you prefer. Mine is just lightly detailed and filled in, so feel free to add more shadows and values.
On the right is a light sketch I did on my B5 Artist's Sketchbook. Draw lightly like this if you're looking to paint or use other coloring mediums so the sketch won't easily show up in the finished painting especially when using a transparent medium like watercolor.

Below I used the same reindeer drawing template, but this time using ZenART's Classico watercolor palette to bring life to it. I used three colors (those inside the red box in the photo below): Indian Red, Raw Umber, and Lamp Black. When I paint in detail, I prefer to use the wet-on-wet method as it gives me more control. But depending on the final effect you want to achieve, you can play around and explore the different watercolor techniques to find out what you like.

And there you have it! Wasn't that quite easy to follow and fairly easy to do? I hope you'll try out this No matter how complicated it seems animals are when drawing them, once you break them down into simpler shapes and in a step-by-step style, it'll be totally achievable! So don't be dissuaded from trying out drawing and painting animals as well as how to draw a basic face and angled faces. You can totally do it, it's a challenge at first but once you get the idea behind how to simplify things, it'll be almost like muscle memory.
We'd love to hear back from you!
What future content would you like to see from us? Let me know in the comments below! Join our friendly art community Painting Inspiration Daily on Facebook. You can share your art and ideas, watch LIVE tutorials, and be inspired to paint!
Looking into how you can start painting in acrylic? Check out this beginner's guide into How To Use Acrylic Paint, from materials to the very basics of starting out. Until then, have a wonderful time drawing reindeer!
- MEET THE AUTHOR-

Kathleen is the Wordsmith at ZenART, resident artist and art editor. When God sent a shower of talents, Kathleen made sure she got a basketful of them! She's a visual artist with practical knowledge in various fields from painting and sculpture, to costume and set design which comes in very handy when writing about various art techniques and theories. She also shares her passion for the arts through teaching. She runs her own brand of handmade wirework jewelry designs.


